Thursday, April 30, 2015

Pumpkin Plants are in the Ground

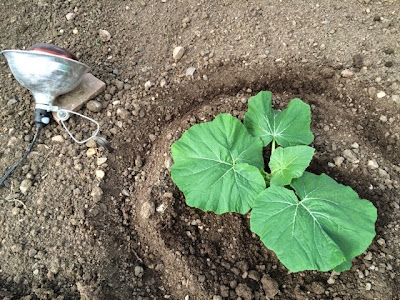
This evening I planted 3 of my 4 pumpkin plants in the patch.  This is the first time I've got the plants in the ground in April.  The forecast looks very good for the next week, so it was time.

The root structor on all the plants looked very good.  In each planting hole I added some Azos, mykos, Root Shield, Actinovate and humic acid.  After that I watered the plants with some liquid seaweed and RAW brand B-vitamins to help the plants with transplant shock.

My 1415 Scherber and the 1985 Miller are my two best looking plants so far.  The 282 Scherber that germinated much later is still under the lights.  I'm going to hold off on planting it for now.

Tuesday, April 28, 2015

Hardening Off the Pumpkin Plant

With the plan of planting my pumpkin plants on Thursday evening, I'm doing a few things now to harden off the plants to get them ready for the outdoors.  This evening I'm leaving the plants in a room with a window open.  No risk of frost this way, but over the next two nights it will help prepare the nights for the cool nights in the hoop house.  I've also been giving the plants outdoor sun as much as I can over the last few days.  If a plant hasn't seen full sunlight and had light breezes on it then it  will wilt something terribly in full sun so the more sun you can get them the better off they will be.

Getting Close to Planting Time

Right now I have my plants under lights, but I'm thinking about putting them in the ground on Thursday. I don't want the plants to get root bound and they will soon be too big to fit under the lights.   From left to right, starting at the top, the first plant is my 1415 Scherber.  First to sprout and the fastest growing on my plants. 2nd is the 1985 Miller.  2nd to sprout (only an hour later) and also a fast grower.  3rd is the 282 Scherber.  This plant was very slow to germinate and about a week behind as a result.  So far it is looking to be an okay plant so far.  On the 2nd row left, is the other 1415 Scherber.  Slower to get going that than the first plant, but looking okay.  The last plant is my 2nd 282 Scherber.  Not sure what to make of this plant.  On the stem there is a small split that has healed and it hasn't grown very well to this point.  Overall, I think I have some plants that I can make something of.


Wednesday, April 22, 2015

Not Famous, But Maybe Infamous

Had a funny experience this evening.  After returning a rototiller to my local Home Depot that I rented to till the kids pumpkin patch I was walking through the store and this guy stops me.  "Are you the Pumpkin Man?  I really enjoyed the show."   I aknowledged with a smile.  I replied, "You must have some memory to remember my face from that far back."

If you don't know what I'm talking about, watch the video here.  I and my wife were on a TV show with Jerry Seinfeld, Julian Moore and Ricky Gervais about 4 years ago.  It was a lot of fun.  On the show my wife and I had a "dispute" about how munch time I spend in the pumpkin patch.  The studio audience voted for me!

How to Beat Your Friend/Family Member in a Pumpkin Weigh-off

Every year I get a message from a few people saying they are in a competition with a friend, family member or neighbor in a friendly pumpkin weigh-off competition.  It always brings a smile to my face when I hear their excitement at the beginning of the season.  I'm a fairly competitive person myself and can understand when a reputation and household pride is on the line.

So you want to win?  I'll give you a few giant pumpkin growing secrets:

  1. Start with the right pumpkin seeds.  The only way you can grow a truly big giant pumpkin is by growing Atlantic Giant pumpkin seeds.  They are the only variety that can grow a pumpkin over 400 pounds.  Now not any atlantic giant pumpkin seeds will do.  You can buy Atlantic Giant seeds at most garden centers, but the seeds you really want are seeds that have had controlled pollinations where you know who mama and daddy are using the best genetics available.  You can get these competition seeds right here.
  2. Read this Blog.  It is packed full of tips and techniques to grow a big pumpkin. During the season I'm going to tell you everything I do with my pumpkins.
  3. Ask questions.  Websites like bigpumpkins.com have growers on them that are some of the best growers in the world.  You can ask questions on the website as well as see answers to questions that other growers have post that will help you grow bigger.
  4. Prepare your soil. Big pumpkins come from world class soil.  It takes some research to figure out how to build a great soil and it can take years.  However, if you send your soil sample off to a lab like A&L Western Labs they can tell you what you have in your soil and what your soil needs.  Too often growers throw down some fertilizer without knowing what the soil needs and it can be more harmful than helpful.  Along with that, sometimes less is more.  Spoon feeding your plants frequently with small amounts of fertilizer is often better than all at once.
  5. Start your seeds indoors.  Start your seeds in a bright warm place indoors in a big pot.  That will help get your plants going early.  Don't keep the plant in the pot too long however or else the plant will get root bound.  2-3 weeks in the pot at most.
  6. Move your plants to a hoop house outdoors.  In most areas springs can be too cool for the pumpkin plants to be perfectly happy.  A hoop house (like a small green house) will help keep the plants warm and protected from the wind.  A hoop house, like a car in the sun, can heat up very quickly when the sun comes out so you usually need to keep it open during the day and closed during the night wit a light bulb in it to keep the plants relatively warm.
  7. Watering.  Keep the ground lightly moist.   How much you water will depend on your soil type and temperatures.  You don't want the ground mucky but you don't want it dry either.  If you go down an inch mid-day after a morning watering it should be lightly moist.
  8. Bury the vines.  When the vines start growing on the plant bury the vines.  At each leaf node the plant will put out a root.  The more your bury the vines the more roots you will have and a bigger pumpkin as a result.
There are lots of other pumpkin growing tips for growing a giant pumpkin, but if you do the ones listed above you should beat your friend, neighbor or family member come October.  Keep reading this blog for more tips and advice.

Sunday, April 19, 2015

Is there Anything Else Like an Atlantic Giant Pumpkin Plant?

I believe this is my seventh year of growing Atlantic Giant Pumpkins.  I'm still amazed by them.  I've seen giant red woods that were two thousand years old and hundreds of feet tall, but to me, although close, they aren't the same as an Atlantic Giant pumpkin plant.  These two plants, pictured at the right, are exactly one week old at the moment.  At this same hour, a week ago, I started soaking my seeds. Look how big they are in that short period of time.

The plant at the back of this picture is nearly six inches wide.  In another 7 days you won't recognize these plants and I'll have to start raising up the grow lights because they will start growing into them.  In June the vines will be growing a foot a day.  The end of July, with a little luck and skill, the pumpkins will be putting on around 40 pounds a day of they are players.  And 90 days after pollination, with a little luck and skill, the pumpkin will be over 1,500 pounds. 

I'm not aware of any other plant that can do that kind of growth in that short period of time.  I'd love to get back to the redwood forest and stare in awe at what nature can do in 2,000 years.  But to me, looking at my pumpkin in the morning and then looking at my pumpkin in the evening and being able to easily see the change in size as it puts on 35-43 pounds in a day is easily as awe inspiring if not more so.

Saturday, April 18, 2015

Hoop, there it Is! Hoop, there it is!

Got my new hoop houses out into the pumpkin patch today.  These hoop houses are a few feet wider and a couple of feet longer.  I'm guessing I'll be able to keep the plants in the hoop house 4-7 days longer with these and it will give me a little more room to move round with them.  I like to get my hoop houses out into the patch a couple of weeks before planting time.  Plants don't like cold roots and you can stunt your plant for a week if the soil isn't warmed up prior to planting.  A clear sheet of plastic on the ground will also do wonders for the soil.

Sunday, April 12, 2015

Let the Pumpkin Season Begin!

This morning I filed, soaked and started my pumpkin seeds.  The seeds I'm starting:

282 Scherber (1725 Harp x self) - this is a seed from the plant that grew the 2,009 pound world record that was "cloned."

1985 Miller (2009 Wallace x 1725 Harp) - Grew a lot of massive pumpkins last year

1415 Scherber - this is a 282 seed that was selfed last year.  Pumpkin was in Colorado state record territory when it went down three weeks before the weigh-off.

Need seeds to grow a giant pumpkin yourself?  It is a great activity to do with your kids or to just have the biggest jack-o-lantern in the neighborhood.  Get your seeds here.

The following is a great article on seed germination techniques:  Seed_Soak_Experiment

Thursday, April 9, 2015

Why Not All Fertilizers are the Same

During my college years, I had a number of friends who were into bodybuilding. I found the supplements and how they could be used to build muscle fascinating. Frankly, I did more research than your average pencil neck geek. However, in the early days, I have to shake my head at some of the worthless stuff I bought. Marketing hype sometimes drove purchases because of my ignorance.  At other times, good research was done, but the studies were early and later researched disproved the early hypotheses. On some occasions good quality supplements were purchased, but the the quantities of the key ingredients were so low that no good would come from them. Much of all of this is the same when it comes to picking fertilizers for your pumpkin plants. All fertilizer labels should read, "Buyer beware!"

I have to chuckle to myself when I go into a hydroponic shop. It kind of looks like a GNC store. Slick looking labels, marketing lingo and lots of promises. You look at the label on some of these products and most of them have good ingredients but very little of the key ingredients. Then you look at the price. For 1/2 the price you could get 3x the amount of product if you got the fertilizer at somewhere other than a hydroponic store. If you were to test the products, in some cases you would find that there was very little of the key ingredients in the bottle. I think of a popular mycorrhiza product that was recently tested and it was found that it pretty much was just kitty litter in the bottle. This is the same product I see getting rave reviews on some of the forums.

If I told you I had a product that in studies it was found, when given in the proper doses, would double your plant size and yield, it may grab your interest. Then what if I told you that this plant supplement was found to increase beneficial microbe activity, increase root mass and was found in university studies to increase fruit yield by over 25%, it may grab your attention. Then, what if I told you is that this magic elixur, used by the past 5 world record giant pumpkin growers could be yours for just $10 per pound, would you buy some?  Then, what if I told you this magic supplement was, drum roll please: water!?

If you go through and read my claims in the previous paragraph you'll find that all of the statements I made were accurate. Water would do all of that for your plant, and although misleading, nothing was a lie. Now you understand how the marketers do it.

Having said all of that, don't think you should not buy fertilizer and other nutrients for your plants. In many cases you need them. But do your research first. Read everything you can. If a fertilizer makes a claim, go read the first hand source and see if it matches up to the claim. Ask other growers if they have used the supplement and what they found. And then do your own trials and take notes. There are great things out on the market, even more than just 6 years ago. But be an informed grower, save money and get a bigger pumpkin!

Wednesday, April 8, 2015

Tilled the Patch and Nailed It

Today I tilled in some algalfa, humic acid, kelp meal, 4lbs of myco and peat moss into the pumpkin patch.  After tilling the patch I put down some winter rye that I pre-germinated in a bucket of lava sand with some Azos.  This evening a little rain fell which should help get that winter rye going.  In early June, I'll till in that cover crop of winter rye.  It will help suppress the weeds, ad organic matter and help add nutrients to the soil that will be readily available to the pumpkin plants.

I expanded the patch some.  The new area's soil is going to need some work, but the amendments I added to the soil are a good start.

Sunday, April 5, 2015

Secret Giant Pumpkin Fertilizing Program

The following is my "secret"giant pumpkin fertilizing program.  This fertilizer program will be modified during the season, depending on what the plant is telling me.  In addition to what is listed below, I'll also be putting down a little Azos, myko, kelp and Rootshield to each leaf node.  What is listed below doesn't include what I amended the soil with in the Fall and Spring.  The Fish & Seaweed is Neptune's, foliar multimineral is Albions' Metosolate multimineral and most of the other products are NPK Industries' RAW fertilizers

If you would like to see a great video that not only explains how and when to use fertilizers, but why, watch this video:


The Giant Pumpkin Fertilizer Program

Please note that the quantities of different fertilizers being applied here are very small. You want to spoon feed the plant to push it along and don't want to pour on the fertilizers which can sometimes do more harm than good.  Fertilizers should be applied in the early morning or the evening.  Most of these fertilizers, bio-stimulants and nutrients are available at a discount at http://seeds.giantpumpkinman.com/fertilizers.

May planting outdoors in hoop houses:
Week 1 B-vitamin, liquid seaweed/kelp, compost tea. With mykos, myco grow, Rootshield and Azos in the planting hole.
Week 2 phosphorus, compost tea, fulvic acid, yucca, silica
Week 3 compost tea, foliar seaweed, foliar humic acid
Week 4 compost tea, fish & seaweed, Azos, Biotamax, Actinovate with iron, Rootshild, omina, silica

June vine running:
Week 5 blood meal (for nitrate nitrogen), compost tea, yucca
Week 6 TKO, foliar multi-mineral, foliar fish & seaweed, fulvic acid, Omina, cal/mag
Week 7 foliar humic acid, compost tea
Week 8 foliar multi-mineral, foliar seaweed, foliar humic acid, yucca

July fruit (assumed that pumpkin pollination will be around the last week of June):
Week 9 foliar potassium, Omina
Week 10 foliar fish & seaweed, foliar multimineral, B-vitamins
Week 11 potassium, foliar fish & seaweed, biotamax, actinovate
Week 12 cane molasses, foliar multi-mineral, fish & seaweed on the soil, foliar humic acid

August
Week 13 Omina, foliar fish & seaweed, foliar multi-mineral, compost tea, silica, foliar actinovate, B-vitamins
Week 14 potassium, Actinovate, Biotamax, azos, yucca, foliar fish & seaweed, foliar humic acid
Week 15 foliar multi-mineral, foliar fish & seaweed, foliar humic acid, silica
Week 16 TKO, cane molasses, fish & seaweed on the soil, foliar seaweed, fulvic acid

September
Week 17 foliar multi-mineral, foliar fish & seaweed, foliar humic acid, B-vitamins
Week 18 TKO, foliar fish & seaweed, foliar humic acid, cane molasses, silica
Week 19 potassium, foliar seaweed, foliar humic acid
Week 20 foliar potassium, foliar seaweed, foliar humic acid

Saturday, April 4, 2015

Time to Get Back into the Pumpkin Patch

This week I plan on tilling the pumpkin patch.  On Thursday there is supposed to be storm, so I'm going to till on Wednesday.  I'll be tilling in some peat, alfalfa, humic acid, silica and expanded shale into the patch.  The expanded shale is something new that I'm trying this year.  From what I've read, it should be good for our Colorado clay soils.  I'll also be putting down about 4lbs of myco into the patch as well.  After the storm, I'll be seeding the patch with a cover crop of winter rye in all but the planting areas.  That cover crop I'll till into the ground when the plants vines start running.

Today I started working on two new hoop houses (kind of like a small green house) for the plants.  These hoop houses are about 2 feet longer and 2 feet wider than my current hoop houses.  I need hoop houses for my kids' plants, do I thought it was time for an upgrade.  These new hoop houses are designed just like my old ones, but with the increased size I"ll be able to keep the plants in the hoop house for another 3-7 days.

I'll be starting my pumpkin plants on April 15th, indoors under grow lights.