Saturday, June 2, 2018

Craziest Growing Day Ever (except for the massive hail storm my second season)

So I went with my son on Friday night to a father and son's camp out with a large group from church.  The campout was only about 2 miles from my house, which was great, because the forecasted low was for 37 that night and I was nervous for the pumpkin plants (I knew my Big Agnes sleeping bag would keep me okay).   At about 4:30am I woke up and it was cold out.  Checked my patch temperature app and and it was 35 degrees.  That meant I had two whole hours until sunrise and only had two degrees to give until the plants froze.  So I drove home and poured warm water on the plants as there wasn't much else I could do.  In the end, it got down to 34 degrees.   Camp ground had a good covering of frost on it, but only 3 leaves on one plant showed any frost damage.  Phew.  My friend whom I gave seeds that lives just two blocks away said he lost his plants.

Right now it is 91 degrees.  Welcome to Rocky Mountain growing.

1974 McConkie
This afternoon I took the hoop houses off the plants.  This was not an easy task.  The 1974 was maybe four feet our of the hoop house and had side vines coming out of holes I cut in the sides on each side of the hoop house.  I've never kept the plants in the hoop houses this long.  It paid up with the high winds we had two days ago and then the cold nights last night.  Big thanks to the family for helping take off the hoops.  They did it with the precision of a surgeon.  It as a little scary, but not snapped vines.  Warm temps and making the plants slightly dehydrated I think helped.

Weather hasn't been horrible this spring, but not great.  But the plants look good.  I started a week later this year, but it appears the 1974 is ahead of my plants from last year.   It is probably the most aggressive plant I've ever grown.  Really beautiful plant.

2145 McMullen
Today I gave the plants some 3-12-12 to help blossoms come on along with some silica.  I'm hoping a female shows up on the main in the next three days on both plants.  This afternoon I gave the plants some b-vitamins, yucca and actinovate.  Also buried the vines with mycos and azos.

I should probably call my plants McPumpkins this year because of the seed names.

I've got to get into the 2145 patch early next week and till the rest of the cover crop in.


Thursday, May 31, 2018

Goodness, Life is Busy

It has been a bit since my last update from the pumpkin patches.  Worked my tail off last memorial day weekend, but unfortunately most of it wasn't in the pumpkin patch.  Trying to finish the landscaping in the back yard so I can plant grass seed and that has consumed my non-job hours lately.

Two days ago I sprayed insecticide on the plants.    I've found a lot of these little caterpillars in the soil.  Haven't been able to figure out what they are going to grow up to be, but I sprayed everything to keep the plants safe.

Yesterday I sprayed some 7-4-5 under the leaf canopy of the plants.  Today I gave the plants some compost tea with seaweed, blood meal, compost, molasses and alfalfa pellets in the brew.  

Weather this week has been cooler, with sporadic clouds.  On average temps have been a little too cool.   Seems like the 1974 plant has been close to its same growth, but the 2145 has seemed a little slower this week, but vine growth still has been descent.

The plan was to take the hoop houses off last Saturday, but they are still not off.  Today was calling for high winds and tomorrow the low is getting down to 37 so I've kept them on.  The plants are feet past the end of the hoop house and I've had to cut holes for the side vines.   It will take a surgeons skill to get the plants safely out of the hoop houses on Saturday, but that is the plan.

The female on the 2145 opened yesterday.  I didn't pollinate it.  1974 will probably open on Saturday, but I won't pollinate it either.  

I'm giving the plants just enough love right now to keep them happy, but it doesn't feel like I've had the time to do the little things.  Hopefully two more females will show up in the next few days and that would put me on target for mid-June pollinations, which would be perfect.   The plants should have good size by then and primed to start growing.

Sunday, May 27, 2018

Putting Tech in Giant Pumpking Growing on the Cheap

I've been killing myself off over the last few weeks trying to get the backyard landscaping done, get a greenhouse setup and do the regular pumpkin patch prep you do each spring.    I'm pretty excited about it all and hope I get it all done. 

First, the low tech updates.  For the south patch, I've added a 4 foot tall wind screen on the south side of the patch.  Here winds only blow from the north and south and the south winds are usually strongest.  It is windy about 90% of the growing days, so this wind screen will help.  I've also added 6 sprinkler heads to that patch.  A nice improvement over the single head on a hose that I moved around the patch manually.  I'll get much better coverage now because water will hit from multiple directions.

The tech stuff is being done in the north patch.   The greenhouse and geothermal heating and cooling system I've talked about previously.  In the greenhouse I'll have an Acurite wireless temperature gauge.  Same kind you use to check outdoor temperatures at the house.  I've connected the data for that to weatherbug.com (easy to do).  Weatherbug.com has an API.  So I'll connect into that data on a website to decide when to do things in the greenhouse.   So, for example, I'll have a simple fan (free cheap one) like you would get at Walmart that we were given) at the top of greenhouse that will be set to turn on anytime after 10:00am but before 8:30pm if the temperature is over a set amount.   The geothermal fan ($40 ebay) will be set to turn on if it is after 1:00 or before 4:00 if the temperature is above a certain amount.  This will pull heat into the soil and blow cooler air out the other end.   And it will be set to turn on after 1:00am but before 7:00am if the temperature is below a certain amount.  This will blow the heated air out at night.  The coding for this is more complicated if you don't know coding, but if you own a website design business it is relatively easy.  The on off switch will be done by an outdoor wifi enabled smart plug ($30).  Using its API the two fans will be turned on and off.

I'm also adding mister foggers ($50 dripworks.com) to help cool the plants during the heat of the day.   These will be connected to a valve that will also be controlled in the same way as the other devices, with misters getting turned on every 15 minutes or so during 10:30am and 5:30pm when the temps are above 86 degrees.

Last change is that irrigation for the north patch.  For the watering I'll have my old Daan micro sprinklers watering under the canopy.   That is hooked into a portable camping water heater ($120 on sale at  Amazon) and then that goes into a fertigation siphon ($15 ebay).  So basically I hope to warm the water to 80 degrees.  The watering will get turned on at about 5:00am which is right before the lowest of the nighttime lows.  That will not only water the plants, but will get the biology in the soil going and heat up the greenhouse.  The fertigation will allow me to constantly add low levels of fertilizer to the plants constantly.  That way the plant will be constantly pushed and never in need.

My hope is that with these changes I can better control the environment and get greater gains for longer during the growing season.

Friday, May 25, 2018

King of the Patch and Final Amendments

Last night I amended the 1974 plant's patch and tilled in the winter rye.   I put down some 32-3-8 with iron, humic acid, manganese, boron and kelp meal and tilled it deep.  The 1974 plant is king of the patch right now.  Big leaves and aggressive grower.  It is about 8 inches from the end of the hoop house right now.  I'll leave the hoop house on it as long as I possibly can.  Will probably have to take it off on Saturday.  It has a female in the vine tip that will be at about 9 feet when the vine lays down (this plant has cobra vines).

The 2145 plant is maybe a foot behind in length and also looks good.  Been delayed on the greenhouse setup for it, but hope to get back to it after the weekend.  The female on this plant has a bit of color to it, so I think it will produce orange pumpkins.

Monday, May 21, 2018

Female Flower on the 2145 at 6-7 Feet

I won't keep it, but I noticed on the 2145 plant that there is already a female flower on the main vine.   That is a somewhat good sign.  Means the plant is kicking into gear and sometimes it means it is a plant that will throw a fair number of females.  That is a good thing, because at 10-14 feet from the stump you want a female(s) to appear when the plant has gotten sufficient in size/mass to start growing a pumpkin.    It is kind of frustrating when a plant doesn't produce many females. 

I once had a plant have a female at 8-9 feet.  I foolishly took it off.   Next female didn't show up until about 20 feet.  The pollination took and was growing really well, but I had to take it off because the pumpkin was badly male formed.  A segment did form correctly and the pumpkin would have definitely split.   It was another 5-6 until the next female showed up and at that point I was way to late into the season.  Lots of female flowers means lots of pollination opportunities.

Friday, May 18, 2018

Updates from the Pumpkin Patch

The last week has flown by and I've been real busy with the greenhouse.  About 1/3 of the way done with its setup.  I hope and plan on having it done next week.

Today was selection day.  Kind of like ripping a child out of the ground.  Always have to think what opportunity is lost when you take out the 2nd plant in a hoop house.  But it has to be done.  I like to look at the characteristics of the plants before making a selection.  It isn't always the biggest plant that is kept.  Today that was true.  For the 1974 hoop house, I went with the plant that was maybe a foot shorter in length.   The two plants for the most part were duplicates of each other, but the one I kept had a much thicker main vine.  I remember Pap once say, "Can't grow a giant pumpkin if the pipe to the pumpkin is a small one.  I've seen plants with massive vines, but small pumpkins however.

For the 2145 hoop house, it was an easy pick.  You don't toss out a plant that is from a seed the grew the world record pumpkin and north American record.  Not only that, it was the obvious choice.  The 1974 plant that was in that hoop house was the runt, but it started wiring up in the last week and I could tell that if it had more time it probably would have made a nice plant.  But we'll never know now.

Here are pics from today.  The first is the 1974 plant.  Like I mentioned previously, Matt said his plant was very aggressive.  This plant doesn't seem to be an exception.  King of the patch right now.  Big leaves, thick vines and a fast grower.

The 2145 plant below has also been a nice looking plant.  The other day I saw roots popping out of the ground around it.   I've only had one other plant do that and it grew my personal best.   So far, I'm very pleased with both plants.   I think they will both be out of the hoop houses next week.  That makes me a little nervous.  Tough springs here in Midway, UT.  Lots and lots of wind with cool to cold temps from time to time.  I've bought some wind cloth and will put that on the windy side of the 1974 plant.  It should help.  Hopefully the 2145 plant will have the greenhouse over it soon, so we can protect it as well.


Today I gave the plants some compost tea with liquid fish, alfalfa, pinch of blood meal, pinch of 6-2-0, actinovate, friendly bacteria, yucca and a tablespoon of liquid seaweed.

Thursday, May 10, 2018

A Little Fertilizer & Compost Tea for the Pumpkin Plants

Today I gave the pumpkin plants some compost tea with a descent dose of alfala pellets in the bag.  I also included a drop of liquid seaweed, a touch of Biotamax and 1 1/2 tablespoons of fish in the 4 gallons of tea.  That will go on all plants.

One 1974 vine should be laying down today.  The 2145 plant's main vine is probably the longest, but it is hanging in the air because of a fairly thick stump which isn't allowing it to lay down easily.  On all of the plants, a few days ago I put a bamboo stick against the main vine at a slight angle.  It helps support the main some as it grows out, but allows the main to slide down the stick as it grows out.  This helps keep the main vine from snapping off from its own weight.

Tuesday, May 8, 2018

Making a Fertilization Plan and Sticking to It

I find one of the hardest things to not do with pumpkin growing is not doing too much.  Too much fertilizer and water can be just about as bad as not enough.   If you make a plan before the season begins I find it helps keep those "urges" in check and it helps make sure you don't accidentally miss something.  

For example, I put together this fertilizer program before the season started:

https://www.giantpumpkinman.com/2018/02/2018-giant-pumpkin-secret-fertilizing.html

Will I follow that plan exactly?  No.   I watch the plants and see what they are telling me and make adjustments, but for the most part I'll following what I outlined.  There are specific things given to the plant at specific times for a specific purpose.   Every plant during vining needs nitrogen.  So unless I see bloated, overly dark or over sized leaves, I will follow what is outlined in my fertilizer program. 

Soon I'll start giving the plants spoon feeding amounts of fertilizer every day.   I know some excellent growers who do that from the very start.   I lean a little more towards letting the plant get what they need from the soil they were just planted in initially.  I figure there should be plenty of nutrients available that first week.  The 2nd week after planting I'll start adding a little light fertilizer occasionally aand then in the 3rd week I'll start putting the hammer down.

Friday, May 4, 2018

The Pumpkin Plants are in the Ground; Let's Role!

I've finally gotten the pumpkin plants in the ground.  Yea!  Forecasted night time lows was for 35 degrees the last two nights and even with heat lamps I didn't want to risk it.  Probably was a good idea.  Power went out around 5:30am today for a short bit.

This is my 2145 and a weak 1974 in this hoop house.   I'll got with the best plant.  I'm guessing it won't be a hard decision for this one.   That 1974 took twice as long to do anything.  Was late germinating, late popping through the soil and slow growing since.  The other two 1974 plants have looked very good however.  Not all seeds are created equal.


These 1974 plants I think will also make for some nice plants.  The 2145 is the biggest, leaf wise so far, but the root systems on all three seemed fairly equal.


Wednesday, May 2, 2018

Latest Pumpkin Plant Photos

Here is the latest picture of the pumpkin plants.  They have really taken off the last five days.  The ideal would have been to plant them last Friday, but I held off because forecasted lows were for 35 degrees the last few days and I decided not to risk it.  I noticed two of the plants are getting lighter color just today, so they are probably not 100% happy in the pots anymore, so the plan is to plant them today or tomorrow.  Interesting to compare these photos with the ones from last Friday.

Friday, April 27, 2018

Pumpkin Plants

Here is the picture of the pumpkin plants.  The 2145 plant is the larger plant on the lower left.  A 1974 plant is on the lower right.

Monday, April 16, 2018

Big Thanks to Ralph Laub

I drove out to Vernal, UT yesterday and got a very nice tour of Ralph Laub's high tunnel and setup.  It was very kind of him to give me a couple of hours of his time to show me not only what he has, but why he has done it the way he has done it.  I know he saved me from some trouble on my geothermal system because of some comments he made.   Ralph was the same person that turned me onto the NRCS high tunnel program and saved me a couple of thousand dollars.  That isn't a small thing, so a big thanks to him.  Wish I would have been smart enough to take some pictures yesterday.

Some Utah growers probably woudn't know it, but Ralph grew the 3rd biggest official pumpkin grown in Utah last year.  He took that pumpkin to another state so I'm not sure most people ever saw it.  The pollinator on that pumpkin was Matt's big one, so some nice genetics in that seed.

Ralph has a nice setup.  A greenhouse that is twice as big as the one I'll be growing in this year with some nice enhancements added to it.  Sounds like Ralph isn't planning on growing this season and instead is going to be doing a pumpkin tour this summer.  I'm sure after that he'll come back with some very nice new ideas for next season.

I ordered my high tunnel today.  Sounds like it could be arriving by the end of next week.

In my own "patch" the 1974 seed seems to be the most aggressive grower so far.  Matt told me it was by far the most aggressive plant in his patch this last year, so it will be interesting to see if that continues to hold true for this season. 


Friday, April 13, 2018

The Grow Closet

I mentioned last year that in my new home I setup a "grow closet" to start my plants in.  Did it on the cheap.   It consists of some T5 lights, brooders with some full spectrum CFL bulbs, plastic shelving and a smart plug.  Outside of spring, it just stores some pumpkin growing supplies.  But this time of year I put a thermostatically controlled space heater at the bottom of the closet and a bunch of lights to get my plants started.  The space heater is set to 80 degrees.  I have two wireless monitors in the closet right now.  One is sitting on the top of a pot nearer to the lights and the other is sitting on the shelf.  85.4 degrees at the top of the pot and 81.8 degrees at the bottom on the shelf.  Nearly perfect.   As the plants grow the lights will be lifted.  I try to keep the lights 4-5 inches away from the plant.

The smart plug in a new edition.  Got it for $10 on Amazon for Christmas and it works nicely.  I'll use it in the greenhouse also.  With it I can set the lights on a timer.  I can also turn them on and off via an app.

The 2145 seed is the first to pop through the soil.  Is is it a sign?  Probably not, but is better than it not showing up at all or really late.

Monday, April 9, 2018

Seeds are Soaking and the Pumpkin Season has Begun

I sanded and have the pumpkin seeds soaking right now.  Two 1764 McConkie, three 1974 McConkie and one 2145 McMullen.   Put a little humic acid and kelp into the water to help with the germination process (no that is not an Amber ale).   Those will soak for about six hours and then will be put the seeds into wet paper towels and a warm place to help complete the germination.  By tomorrow evening I should start seeing some roots.

Sunday, April 8, 2018

Finding the Square Footage of Your Pumpkin Patch or Anything Else

In addition to doing my patch prep right now, I'm trying to complete the landscaping for the backyard.  Then very soon I'll be doing the greenhouse.  Three big projects in a two month period.  Not ideal.   But I pretty much have to get it all done. 

While trying to figure out how many square feet of landscaping rock I needed for the yard I ran into a problem.  I need a lot of rock, but the areas that will be covered are hard to measure because it mostly isn't simple square areas.  There are lots of different angles.  It then occurred to me that I may be able to find a solution using Google Maps satellite view.  I had used a tool once that would allow you to calculate a distance in feet on the map, so I wondered if there was a tool that allowed you to calculate an area on a map.  Low and behold there was:

https://www.daftlogic.com/projects-google-maps-area-calculator-tool.htm

This website allows you to pick points for the corners of the area and it then figures out the square footage.  You can do multiple areas which it will then total.  So you can easily look at the satellite view of your pumpkin patch.  Pick the corners of the patch and within about 1/2 foot have an accurate measurement for the pumpkin patch or any other area of any size.  Pretty cool.

Wednesday, April 4, 2018

Patch Prep 2018 Has Begun

Today I dug out the area for the heating cables in the south patch.  Put them about 8 inches down into the ground and then buried them.  This will be the same area that the hoop house will go in a couple of weeks.

The corner flags will stay there all season.  They help me make sure I don't till them and make it a little easier to dig up the cords in the fall.  The center flag is were I'll be planting the pumpkin plant.  

I'm going to start my seeds five days later this year.  The first weigh-off is a week later this season and I felt like I was cutting it too close last season with getting the plants frosted.  Last frost for me is around June 1st.  I was out of the hoop house well before that and had some nights around 38 degrees last year, so better safe than sorry.   I'll still have two more days of growing this year, so I think I'll be in good shape in the weather will cooperate. 

Saturday, March 24, 2018

The Pumpkin Season has Begun (Kind of)!


This time of year for years I've done the same thing.  As the weather starting warming up and you start seeing some of the crocus and daffodils peaking through the ground, my pumpkin growing fever starts to rise.  To curb the cravings I like to start something off that can be productive.  I've talked on this blog a couple of times about getting myco going in pots before you start your actual seeds.  I won't be start my plants for a couple of weeks, but it takes a while for myco to become mature enough that it is actually providing some benefits to the plant, so it is good to start it now. 

At the Niagara seminar Neil Anderson of RTI, whose company makes more myco than probably any other company out there, stated (somewhat quietly), that it may take a couple of months for the myco to get to the point that it is bringing back nutrients and water back to the plant.  I stuck around after his seminar and asked some additional questions about that.  He suggested during the seminar that "pre-starting" some myco before you started the seeds and then transferring that seed starting mix to the pots may be a good idea.

Typically I would have started some seeds a week ago, but I only got these started two days ago, because life has been very busy lately.  Using the paper towel method I started two 747 Johnson seeds.   Those sprouted and I then put them both into one pot with two different brands of myco, Azos and some other beneficial bacteria.  I also put a pinch of a WOW Super Start Pack in the seed starting mix.  The day or day before I start my actual seeds I plan to grow this season, I'm pull the plants from this pot and mix the soil in the seed starting mix of my other pots, so each pot will get some of this more mature myco.

I'll still put some additional myco and microbes in the pots of the plants I'll actually be growing this season.  

The other benefit of doing this is that it forces me to get my stuff pulled together in advance of when I start my actual plants and gives me a little practice.  For example, in the pot I put the seeds in today, I should have put a little humic acid into.  Hopefully this will help me remember when it becomes more important.

In about 3 days I suspect I'll start seeing the plants popping through the soil.  I start two plants in the soil to get more roots going throughout the pot quickly.  I figure more roots means more myco getting fed.  


Saturday, March 17, 2018

Amazingly Grateful: High Tunnel in the Pumpkin Patch in 2018

When we decided to move to Midway two years ago, I immediately decided that I would need a greenhouse to grow a pumpkin of any size. Overnight lows in the low 50s in July and a growing season that is literally a month shorter than Denver's (which isn't very long) I knew it would make it a challenge to grow a pumpkin that is 1,500+ pounds.

Last season I realized it was worse than I thought. High minds plague my area and I saw considerable damage to the plants as a result. To my rescue, Ralph Luab came. He didn't know it, but he had just what I needed. He was kind enough in early June to bring me some pollen from one of his plants because it was looking like I wasn't going to have pollen available to pollinate a female that was going to be opening the next day. He came all the way from Vernal to help me out. When he arrived I showed him the patch and was complaining about the terrible winds we had had for the previous two weeks and how beat up my plants looked as a result. He said, "I've got the same problem in Vernal. I found a government program that pretty close to gave me a free high tunnel." My ears perked up and I immediately said, "Do tell." He then began to tell me about a conservation arm of the federal government called the NRCS that does financial assistance for high tunnels.

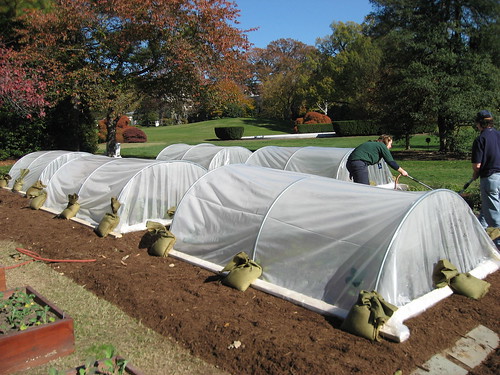
A high tunnel is basically a greenhouse, but without power. For the program you basically have to do a lot of paperwork and if approved they cover about 95% of the cost for the high tunnel. Budgets change year to year for the NRCS, but for my NRCS office I think there were about 12 people that applied in the previous group, initially 10 were approved and then they got some more funding, so they were able to get everyone that applied a high tunnel. I filled out the paperwork and in the end of November the deadline ended and then after some more paperwork and a site check I found out this last week I was approved and signed the contract for my high tunnel. I'll be installing a 24x32 high tunnel which will have enough room for one plant and I should get funded this next month.  Pictured to the right is a larger version of the same one I'm getting.

Why would the government do a program like this? I don't know all of the details. I know part of it is for land conversation and I know another is to get more people farming, either in their neighborhood backyard or on larger agricultural farms. I was told when signing the final paperwork for a high tunnel this last week that the High Tunnel System Initiative came from Michelle Obama. As you may recall, she kind of had two initiatives that she headed up as first lady. One was to get kids fit. The other was gardening. They had a nice garden at the white house and had some small high tunnel hoop houses as part of it.  The high tunnel initiative kind of came out of this.
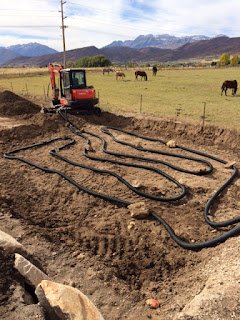
As you may recall, I put some pipe in the ground where this high tunnel will be going in about a year and half ago.  This was added even before we moved into the house as near as I can recall.  That pipe will be used as a geothermal system to help warm the hoop house during the night and cool it a little during the day.  An inline fan will pull the hot air at the top of the high tunnel into the underground piping, heating the soil.  At night, when it has cooled down in the high tunnel it will turn that inline fan on again and push warm air back into the high tunnel, using the warmed soil to heat that air that is going back into the high tunnel at the other end.

I also have four 50 gallon water barrels that will be painted black and put on the west side of the high tunnel.  Those barrels will heat up during the heat of the day and then will release their warmth back into the high tunnel at night.

On Ralph's advice, I've also purchased a portal water heater (made for showering outdoors) that I'm going to use to warm the irrigation water that waters the plants in the early morning hours (about 5:00am), when the temp in the high tunnel will be at its lowest.  Ralph said he was able to output water at about 80-85 degrees and the high tunnel warms right up after that and stays warm for a good while.

I'm hoping that between these three things, I can create an environment in the high tunnel that is more like the growers have in Ohio or Rhode Island, rather than what I have now at over a mile in altitude surrounded by mountains on all sides (it does make for some pretty views).  My day time temperatures aren't too bad.  By 1:00 to 2:00 it can start to get a little warm, but my highs on average are about 5 degrees cooler than Salt Lake.  If I can get my average night time temperatures 5-10 degrees warmer and protect the plant from the wind, I should be in good shape.

There is going to be a lot to figure out this next season, since it is all new to me.

Sunday, March 11, 2018

Giant Pumpkin Growing 101: How to Grow a 1,000+ Pound Pumpkin

This video covers everything you need to know to grow a 1,000+ pound pumpkin. All of the "secrets" to giant pumpkin growing are revealed.   The entire growing season is covered step-by-step in this informative how-to video.  Everything for beginners to experienced growers.

Giant Pumpkin Growing 101 Plus Advanced Growing Tips Video Coming

Since we got started a little late yesterday at the seminar, I didn't have a chance to complete the presentation yesterday, so what I've decided to do is create it into an online video and I'll post it here.  Download the presentation at the link below and watch for the video to come out very soon and be posted here.