Sometimes I get asked what I use for my seed starting mixture. If you dig deep enough into this blog you'll see that I've done testing with different seed start mixtures. I prefer a soil less mixture. Some of the best genetic pumpkin seeds can be hard to come by so I prefer a medium other than soil so I can be sure that no pathogens are in the mixture. Pro Mix BX is my favorite seed starting mixture, but so far it has been hard to find in Utah. I had one bag, but that wasn't enough for my two pots, so I'm trying coco hair this time in a couple of pots, which I've read good thing about.
In my pots I'll add some humic acid, NPK Industries Microbes Grow formula and this year I also added some Lebanon Turf Roots (I bought it for the landscaping plants I've started indoors). In those two substances there is a good mixture of myco and beneficial bacteria along with micro amounts of different nutrients. I don't put any fertilizer in the pots. Everything the plant will need for three weeks are in the seed starting mixture and fertilizer is not necessary. I won't give the pumpkin plants any fertilizer until they are planted outdoors in the soil. Actually I do give the plants some diluted kelp in the pots, but that is about it.

Learn How to Grow a Giant Pumpkin. Competition Giant Pumpkin Seeds, Fertilizers & Growing Tips from Jamie 'The Pumpkin Man'. The Most Read Extreme Gardening, Pumpkin Blog in the World.
Showing posts with label pumpkin growing tips. Show all posts
Showing posts with label pumpkin growing tips. Show all posts
Wednesday, April 5, 2017
Sunday, June 28, 2015
Einstein's Theory of Relativity and Pumpkin Growing

I often find that "slow" plant growth or pumpkin growth is sometimes relative to what I want rather than the reality of what is happening. I can't count the times that it seemed like early in the season that the vines are growing slow until I looked at a picture of my plant on this pumpkin blog (I'm this blog's #1 reader) from 5 days before and only then realized how much the plant had grown. It is all relative.
This perspective in pumpkin growing often makes us a "moreon" (pronounced moron). I can't count how many times, after seeing another grower's big pumpkin the grower goes home and pours on a bunch of fertilizer on their plant. Often times "more on" doesn't work. A perfectly happy plants lives in a space between just the right amount of water, nutrients, sunlight and warmth where everything is working in balance and harmony so a plant wants to grow. As Goldie Locks will tell you, too much or too little doesn't work. It all has to be just right.
So this is my pumpkin growing tip of the day. Don't be a moreon. Start by researching everything you can about how to create a great, balanced soil. Then get a soil test, do plant tissue testing, do soil EC testing or whatever you can afford to find out what your patch has and what your plant needs. After that, develop a pumpkin fertilizing program and put it on paper. List what you will give to your pumpkin plants each week in spoon size amounts. Doing this will allow you to give the right amounts of the right types of fertilizers so you don't become a moreon. Doing this will allow you to focus on your plant and not get distracted by what others are doing or anxiety.
Next, make proper adjustments to your fertilizer program based on what the plant is telling you and the weather. A good fertilizer program should be a guide, but not a hard rule. Use your experience and what the plant is saying to guide you in what you do. If you are inexperienced, than follow my fertilizing program and talk to other growers and ask them for their tips and advice.
Lastly, even if you are experienced grower, ask for other growers opinions. Like I said before, sometimes you get too close to the plants and you are missing the obvious. Or someone might have some good tips for things you never thought of. Just this week I asked advice of a grower for things that I was pretty sure I had the right answer for but I wanted to be sure. Getting a second opinion sometimes sparks new ideas and keeps you out of trouble. All of this will allow you to be an Einstein in the pumpkin patch and grow your biggest pumpkin yet.
Monday, June 8, 2015
1985 Miller Plant has Left the Building

Gave the plant a drench of compost tea with Rootshield and RAW Kelp (learn more) and RAW Humic Acid (learn more) added to it. This will be the last kelp I'll give the plants for a few weeks. I've read studies that liquid seaweed is good for fruit set, but there is some suggestions now that although it may help with fruit set it may slow down the fruit becoming the main sink of energy in the plant initially becomes some of the hormones in the kelp might inhibit that. A sink is pretty much anywhere there is growth in the plant. Roots, vines and pumpkins are all sinks. You want the main sink of the plant to be the pumpkin, so it gets the most energy.
That 1421 Stelts plant two years ago was an incredible sink. Almost a black hole. The pumpkin grew like crazy and the vines almost completely stopped once the pumpkin kicked in. Not sure if you want it to that extreme, but you want the fruit to be established as the main sink as quick as possible.
Kelp on the soil, applied as a drench, is a great way to increase the root mass becomes of the hormones contained within the kelp. Kelp when applied to the leaves as a foliar application in increase lateral branching. Those results are amplified when humic acid is added to a drench and fulvic acid is added to a foliar spray of kelp. That is your pumpkin tip of the day.
Tuesday, June 2, 2015
Tilled the Cover Crop Today in the Pumpkin Patch

This is the best cover crop I've ever had. All of the warm weather in April and then a ton of rain in May really helped it grow. Now that it is tilled into the soil it will break down quickly. With warm temperatures, it will mostly be gone in two weeks, just in time for the vines growing all over the place.
Hot in Denver today. I think it hit around 93 degrees today. Went from what felt like winter two weeks ago to summer in almost no time at all. Too warm for plants in hoop houses, but they seemed to do pretty well in spite of the heat.
Monday, May 18, 2015
Make The Plants Think They Are in Maui
When I was on the south shore of Maui last year, near the base of volcano I realized that I might have found an ideal growing area. Moderate rain, volcanic rich soils and 84 degrees, year around could be a place that a world record pumpkin could be grown. It is no wonder that Monsanto is all over the island.
Denver is no Maui, Rhode Island, Ohio or Napa Valley when it comes to pumpkin growing. Cool springs, warmer than ideal summer days and cool nights with low humidity make pumpkin growing challenging. Colorado has its obvious plus sides however, so I'm staying.
 When it comes to the pumpkins however, you have to make them think they are in Maui. This is somewhat easier to do in the Spring, when the pumpkins are in protected hoop houses. With heat sources at night, the hoop houses stay a minimum of 5 degrees warmer than the outside temperatures, humidity is higher and on a sunny 65 degree day it is easy to have a hoop house at a perfect 85 degrees with a perfectly happy plant.
You've heard me moan about the weather in Colorado this spring. Very little sun and cool every day for almost three weeks now and it doesn't look like this trend is going to break until maybe next week. So you make the best of it. As you can see in the picture at the right I have a full spectrum CFL bulb in a brooder to add some additional light on cloudy days like today. Also, have a heat lamp going to keep it a touch warmer inside. Trying to make these plants think they are in Maui. We aren't quite there yet, but getting a little closer.
Denver is no Maui, Rhode Island, Ohio or Napa Valley when it comes to pumpkin growing. Cool springs, warmer than ideal summer days and cool nights with low humidity make pumpkin growing challenging. Colorado has its obvious plus sides however, so I'm staying.

You've heard me moan about the weather in Colorado this spring. Very little sun and cool every day for almost three weeks now and it doesn't look like this trend is going to break until maybe next week. So you make the best of it. As you can see in the picture at the right I have a full spectrum CFL bulb in a brooder to add some additional light on cloudy days like today. Also, have a heat lamp going to keep it a touch warmer inside. Trying to make these plants think they are in Maui. We aren't quite there yet, but getting a little closer.
Tuesday, May 12, 2015
The Right Phosphorous at the Right Time for 20% Greater Roots
 |
| 1985 Miller Pumpkin & Some Fat Head Guy |
The other thing I've added to the mix is monoammonium phosphate, which I gave to the plants today. I'm using the RAW brand of phosphorous which is the purest form of momoammonium phosphate you can buy. It is 9-61-0. I'm using only between 1/8 to 1/16 of a tsp on each plant. You don't need much. This form of phosphorous has been proven in a study to increase root mass by 20% when used in the first three weeks of growth. Phosphorous is the power source of plant growth and early in the season you want to focus on growing roots. In about two weeks we are going to change that focus to growing vines, but right now the roots of the plant are what we want to grow the most.
 In addition to phosphorous, I added in some fulvic acid and yucca. Everything was mixed in with some compost tea that I started brewing yesterday. The fulvic acid is a natural chelator which will help the plant get at nutrients in the soil. The yucca is a wetting agent that helps water and nutrients penetrate more evenly and deeper into the soil. Some studies have found greater root mass when yucca is applied to the soil. Some have suggested that something in the yucca is causing that, but I think what will eventually be found is that water is being spread into the soil more evenly with the yucca being applied so the roots extend into more areas of the soil and the end result is a great root mass.
Sunday, July 6, 2014
Compost Tea for the Pumpkin Plants
This evening I gave both pumpkin plants about four gallons of aerated compost tea (2 gallons per plant). As noted before, compost tea typically doesn't have much in the way of NPK or nutrients. The reason you apply compost tea is for the biology.
I'll use different things for my compost tea. Today, in a paint strainer's bag, I put in about a half a cup of earthworm castings, about a quarter a cup of alfalfa pellets and one old, dried leaf. That was put into a 4 gallon container that had water in it that had sat for about 24 hours so the chlorine from the tap water could evaporate.
I then had air from a fish tank pump bubble through the water to aerate the compost which will help keep harmful organisms from developing in the water. At about the 24 hour mark I added about 1 1/2 tablespoons of un-sulfered molasses to the water. That will allow the bacteria a food source in the water. I then brewed it for an additional 8 hours.
After that I pour the compost tea on the leaves and ground. I usually put the compost tea in a watering can then swing my arm in a sideways motion so that the compost tea will splash across the leaves. Often I'll pour a little near the stump and on the area of the main vine as well. The friendly bacteria and fungus from the compost tea should help protect the plant and help the plant get at nutrients in the soil.
Thursday, June 26, 2014
Hail Netting #2; A Test
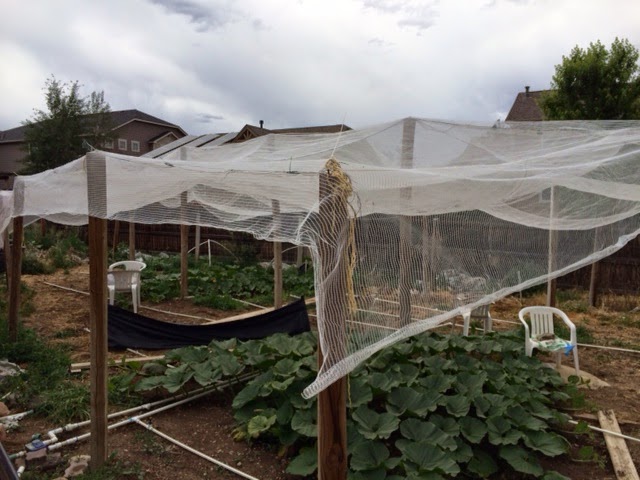 Possibly under the false assumption that we will see sunny days in Colorado again, I put up a 2nd piece of hail netting, on top of the 1st piece this afternoon. I came up with this idea over the winter. My current hail netting has a 14% shade factor, which undoubtedly helps on the hot Colorado summer days. However, on the really hot days it isn't quite enough to be ideal. I learned from Pete's patch a few years ago that these plants don't need a ton of sun. Pete grew on the east side of his house. The patch was probably 225 square feet, which is small. And he pulled a very nice 1306 pound pumpkin out of the patch that year. After about 1:00 about half of his patch was in the shade. By 2:00 most all of the patch was in the shade. You would think that would be a problem but our big temperature swings from high 50s at night low 90s during the day seem to be a bigger problem. Since his pumpkin was in the shade during the hottest part of the day I theorize that his pumpkin was able to grow more during the day because it didn't have to deal with as big of temperature changes during the day.
Putting that theory to the test, on only the west side of the patch, I've added an 18% shade cloth. I'm not sure if in this case if 14% + 18% actually equals 32% shade, but for sure the plant won't have to deal with as much brutal sun after the lunch hour. We will see if that works.
That is, if, we ever have a full sun day in Colorado again. Its been a very screwy spring and early summer this year. 88 degrees right now but completely cloudy this afternoon like it has been every afternoon for the last month.
However, if there is one truth to Colorado weather, if you don't like it, just wait an hour and it will change.
This evening I sprayed the entire patch with one Biotamax tablet and then watered it in.
Friday, June 20, 2014
Hopefully We Are Growing Pumpkins Now

I like the shape of the pumpkin on this one. It has a bit of length to it. Usually the shape of the pumpkin on the vine will indicate what the shape of the pumpkin will be but that isn't always the case. Pumpkins that are long and not so tall tend to have less problems with blossom end splits (BES). Tall pumpkins have more problems with BES but they tend to look bigger which is kind of cool. But a pumpkin with a split isn't qualified for a weigh-off so it is better not to blow them so you can show them.
As you can see in the picture I need to remove the side vine next to the pumpkin. I'll wait a day or two to see if the pumpkin is growing before I remove that however.
Today is going to be cooler than what most of the days I've pollinated on in the past. Usually it is at least 92 degrees on a pollination day but today is going to be mid-80s which is ideal.
I've had good success with my pollinations taking in the past. I don't really do anything special. I lay off nitrogen fertilizers prior and just after pollination. I also put one of those white lawn chairs over the female flower days prior to the pollination. I think if you can help keep it cool and relatively dry your changes go up for the pollination taking. 10 days from now I'll know if it worked. When the pumpkin gets real shiny where you can almost see your reflection in the pumpkin is when you know things are going well. Usually that is around day 8.
Today I gave both plants some compost tea. I also gave a foliar application of Nutri-Cal to the 335 plant which is basically a calcium nitrate fertilizer. The 335 growth has been relatively slow lately, so I'm hoping this will kick it into gear.
Saturday, May 17, 2014
Not Loving this Weather But Plants are Doing Well
My plants are at about the same stage of growth as last year's plants but I'm not loving our weather this early season. Partially cloudy makes it hard to control the temperatures in the hoop house. I'll watch the temperature monitor and the hoop house will go from 75 to 88 and back down to 75 in the course of an hour depending on if the sun is out or not and it changes a lot. We haven't had many of what I would call sunny days this spring. Sun in the morning and then cloudy most afternoons.
Ideally I'd like to have the hoop houses at a constant 90 degrees. The humidity stays higher in the hoop houses so 90-92 degrees is great. You don't want much more than that. Without the hoop houses I'd like about 88 degrees. I think a perfect enviroment for pumpkin plants would be about 88 degree days with a bit of humidity and then about 80 degrees at night. These plants don't like big transitions in temperatures so Colorado isn't an ideal growing enviroment with our 60 degree summer nights and 93 degree days with low humidity.
Today my son and daughter's planted their pumpkin plants. We are about two weeks late but they are both beautiful plants. Both plants already have their vines down on the ground. If the plants can transition to their outdoor environments quickly they will both do fantastic. My daughter's 335 Scherber plant in particular I think will do well. Round 1161 Rodonis leaves like papa had tells me that it will lean a little more to that side. My 335 Scherber plants have the pointy 1421 leaves so it will be interesting to see how those pumpkins turn out.
Today I gave all of my plants a divided portion of four gallons of aerated compost tea with one teaspoon of liquid seaweed, teaspoon of fulvic acid, half a tablet of Biotamax, 1/2 tablespoon of Azos and a touch of Actinovate added to the tea just before pouring. I might have over done it but that biology added to the soil could do some good to promote growth and help protect the plants.
Tuesday, April 15, 2014
Warming the Soil for Planting Time

Clear plastic works best I think to warm the soil. It won't get overly hot like black plastic which could start killing the biology in the soil, but should keep it at a nice moderate temperature.
Sunday, October 6, 2013
10 Things to Do to Grow a Giant Pumpkin
I often get asked by newer or struggling giant pumpkin growers at the weigh offs as to what they could do to grow bigger pumpkins. I'm always grateful for the question but a bit suprised, because in my own way I feel like a struggling gaint pumpkin grower who is always asking questions. I've had a certain level of success but there is always so much more to learn. Here are the secrets to growing a giant pumpkin that I know are needed to grow a pumpkin that will bring smiles to peoples faces and stop cars in their tracks:
- Good seed is needed to grow a giant pumpkin. Without a quality Atlantic Giant pumpkin seed you aren't going to be growing a giant pumpkin. My seeds will be available in November.
- Join the Rocky Mountain Giant Vegetable Growers club. This isn't a sales pitch. It is worth it. You'll get newsletters and access to tips from some of the best growers in the country.
- Get your soil tested. No grower can tell you what your soil needs unless they know what is already in your soil. Once you get your soil tested post the results on bigpumpkins.com's message board and people can tell you what you need to do.
- Buy and read Your Ideal Soil. Understanding the proper way to build a world class soil is frankly a bit complicated. The book is the easiest and best read I have found.
- Prep your soil in the fall. When you have planted your pumpkin plant in the ground in the spring 85% of what determines how big your pumpkin will grow will be determined by how well your soil is prepared. What you put into your soil in the fall is going to be determined by what your soil needs. I like to put down gypsum (for the calcium), elemental sulfur (my pH is high), lots of alfalfa pellets (100lbs over 1000 square feet for organic matter, nitrogen and growth hormones), humic acid, 1-3 yards compost and maybe some of the newly fallen leaves. Till that into the ground 8 inches deep. If the weather permits plant a cover crop of winter rye before it gets too cold.
- During the winter ask questions of growers and read everything you can online. Also watch the How I Grew the 2009 Wallace DVD by Ron Wallace.
- Order the Xtreme Gardening Giant Pumpkin Kit. Again, not a sales pitch. In this kit are the things that the best competition giant pumpkin growers use and the book that almost every giant pumpkin grower has read.
- Start your seeds between April 15th and April 25th indoors in a warm (85-90 degrees) place and in a bright place (adding full spectrum lights may be required).
- Around the first week of May put your plants outdoors in the pumpkin patch inside of a hoop house. Try to keep that hoop house around 90 degrees during the day. Get a watering system in place that will evenly water the entire pumpkin patch.
- Once your pumpkin starts vining bury the vines. At each leaf node the pumpkin plant will put down roots and the more roots you get the bigger your pumpkin should be.
Saturday, September 7, 2013
Giant Pumpkin Growing Tips & Secrets
I got a great email from a new giant pumpkin grower that I thought I would share with everyone because this grower was asking the right questions in order to grow a big pumpkin. The pumpkin growing tips that were asked kind of get at the heart of what it takes to grow a giant. They are:
This evening I gave both pumpkin plants some foliar fish & seaweed along with a fairly heavy dose of 0-1-1 and a little multimineral.
1. When do I send a fall soil test?
2. Does foliar application have to be under the canopy or
is it sprayed on top?
3. What is the best organic fertilizer? Do I broadcast on
the ground our apply as a drench?
The following is my reply to her questions:
"Thanks for your questions. At this point of the season you can get a soil test at any time. The sooner you can start prepping for next season the better. I know of two growers that have actually pulled their plants with pumpkin still growing because the pumpkins were small for them and they wanted to start getting ready for next year.
Most of what will determine how big a pumpkin grows is going to be determined by work done on the soil in the fall and early spring. Foliar applications can be on top of the leaf or the underside of the leaf. The underside of the leaf is better because the cuticles are larger on the bottom side of the pumpkin leaf so they have a better capacity to take in nutrients. However, it isn't always easy to get to those undersides, especially when the plant gets large.
The "best" organic fertilizer is relative to what your plant needs. One of the hardest thing to learn as a grower is figuring that balance out. There a lot of growers to help you with that. Basically with a good soil test you will be able to find out what is in that soil. Once you know what a pumpkin plant needs then you can start choosing what to feed a pumpkin plant to get the greatest gains. Almost everything I give my plants is organic. I use Fish & Seaweed (Neptune's brand) a lot as a foliar application. My soil is pretty rich with nutrients. In some cases I have too much of certain types of nutrients. For example potassium is very high in my soil. The roots can only attach to so many nutrients at a time (cations) and potassium attaches easily. Because of that other nutrients have a hard time getting absorbed even though they may be in abundance in the soil. So, for example, my spring soil test said that I was high in sulfur. However I did a leaf tissue test in June and it showed my plants were a little low in sulfur. Why? Because potassium was blocking the absorption of the sulfur as well as a few other nutrients.One of things I've been zeroing in more on the last couple of years is how to do foliar applications of certain nutrients that my plants need that the plant may not be getting from the roots. If you read my pumpkin blog at www.denverpumpkins.com you'll see me mention foliar applications of different things 5-6 times a week. That is very small quantities of those nutrients to get the plant exactly what it needs.I hope I haven't made this sound overly complicated. In some ways it is and in some ways it is not. If your goal is to grow a 600+ pound pumpkin next year than doing soil prep now, getting 400+ square feet of soil balanced, getting some quality Atlantic Giant pumpkin seeds from a competitive grower, reading up on how to grow giant pumpkins, burying the vines as they grow so that they can root then giving the plant some granular fertilizer and some foliar applications during the season and you should easily do just that.If your goal is to grow a 1,000+ pound pumpkin then it takes a good seed to do that sometimes. Every seed in a pumpkin has different genetics. My plants this year is a good example of how genetics determines growth. Both of my plants are about the same size at about 500 sq feet each. I try hard to make sure that the entire growing area (all 500 square feet) is great soil and evenly built up. This year I got a little too much nitrogen on the 1775 plant side and that cost me but otherwise everything is exactly the same for both plants. However, my 1421 pumpkin is going to end up around 1,400+ pounds and the other pumpkin is going to end up around 700+ pounds. The difference: genetics! Some plants just want to grow pumpkins and some plants do not.The other piece of growing a 1,000+ pound pumpkin is hard work in the patch before and during the season, good weather and experience. With experience you can recognize problems before they happen and know what to do for them when they do happen. A lot of giant pumpkin growing is mitigating risk and that only comes with time and advice from other growers so continue to ask lots of good questions.I'll let you know what you have to do to grow a 1,500+ pound pumpkin when I get there. I'm hoping my big pumpkin will get there this year. There really aren't any secrets to growing a giant but there are about 700 different things you need to learn to do well to get there along with a little luck."
This evening I gave both pumpkin plants some foliar fish & seaweed along with a fairly heavy dose of 0-1-1 and a little multimineral.
Sunday, August 25, 2013
Actinovate to Prevent Powdery Mildew
This evening I sprayed the pumpkin plants with Actinovate to help slow down powdery mildew which is starting to show up. At this point of the season I'm not overly worried about it, but I don't want to let it get out of control. The 335 plant has shown the worst early signs of it but it is okay. In the last few days I've seen it show up on the 1421 plants older leaves that are shaded. Strangely the 1775 plant has shown none. What is strange about that is that with the leaf burn this plant has sustained you would think it would be more suspectible but I haven't seen any spots on it so far.
Saturday, August 10, 2013
Pumpkin Patch Video Tour
As promised, the following is a video of my pumpkin patch as shot earlier in the week. Very pleased with where things are at right now. Stanley continues to grow very well. Warning: this video and its narrator may cause drowsiness. Do not drive or operate heavy machinery while watching this video.
Saturday, July 27, 2013
Latest Pictuers from the Pumpkin Patch
These are pictures of Stanley and Elbert. Both have made very nice gains this last week, even though the weather has been abnormally cool (Stanley set a new personal best yesterday for one day gains and has doubled its weight over the last week). The 1775 plant is probably 2-3 days from having filled in all its available space and then it will be terminated on all vines. The vines have grown like crazy the last three weeks and I'm hoping that after it is buttoned up then the main sink will become the pumpkin for even better growth.
This morning I sprayed some Vegetable & Fruit Yield Enhancer on the soil under the canopy. It is a mixture of beneficial bacterial, myko and 3% humic acid. I also gave the plants a foliar application of magnesium sulfate for the magnesium and the sulfur.
 |
| 1421 Stelts (Stanley) |
 |
| 1775 Starr (Elbert) |
This morning I sprayed some Vegetable & Fruit Yield Enhancer on the soil under the canopy. It is a mixture of beneficial bacterial, myko and 3% humic acid. I also gave the plants a foliar application of magnesium sulfate for the magnesium and the sulfur.
Saturday, July 20, 2013
Latest Pictures from the Pumpkin Patch
The first picture is of the 1421 Stelts (Stanely) and the second is the 1775 Starr (Elbert). Elbert was a really disappointing pumpkin early on but I still have hope for it. At day 20 it is the shiniest that it has ever been and over the last few days its circumference measurements increase in inches have been on par with what they should be right now so maybe it is just a late bloomer.
Stanely is by far the best pumpkin I have ever had. The 10 day measurement I think was the only measurement that I've had that was behind any previous pumpkin that I've grown in the past. It has just been a fantastic plant so far. The one thing that I would like to see out of this plant still is more vine growth after the pumpkin. I think for this plant to continue to drive the pumpkin in the later part of the year I need a bunch of new growth and at this point I'm not seeing it like I would like. However, my hope is once the vines after the pumpkin get rooted I can start seeing some better results. This plant seems to root very well.
The vine growing on the 1421 hasn't ever been aggressive but hasn't ever been slow either. It has been a descent grower. The main vine is already as long as last year's plant and we still have two more months to go.


 This evening I gave the 1775 plant some liquid seaweed to encourage it a little.
Stanely is by far the best pumpkin I have ever had. The 10 day measurement I think was the only measurement that I've had that was behind any previous pumpkin that I've grown in the past. It has just been a fantastic plant so far. The one thing that I would like to see out of this plant still is more vine growth after the pumpkin. I think for this plant to continue to drive the pumpkin in the later part of the year I need a bunch of new growth and at this point I'm not seeing it like I would like. However, my hope is once the vines after the pumpkin get rooted I can start seeing some better results. This plant seems to root very well.
The vine growing on the 1421 hasn't ever been aggressive but hasn't ever been slow either. It has been a descent grower. The main vine is already as long as last year's plant and we still have two more months to go.


Monday, July 15, 2013
Giant Pumpkin Growing Tips; Making Adjustments as You Go
The hardest part about growing giant pumpkins is that there are 1,000 different pieces to growing a big pumpkin and those pieces change from time to time. Two years ago I had insect problems, least year it was heat some time in the future it might be rain and the potential list goes on. Also growing in Colorado isn't the same as growing in Ohio or California. Every area has their unique challenges. That is part of what makes this so fun. It isn't easy. It can be heart breaking. But the hope of growing a really big pumpkin keeps me coming back.
One tip I would give anyone that wants to grow a giant pumpkin is make sure you do the basics very well. Get your soil tested and understand what is required in a soil to grow a giant pumpkin. This is an ongoing effort but the basics, if you can find someone to guide you are somewhat simple.
The next tip would be to understand the different cycles that a pumpkin plant goes through during a season. This takes time to learn but when you recognize what a plant is doing you can take advantage of it.
The last time is to understand proper watering. This also isn't quite as simple as it would seem but again the basics are pretty simple. Keep the soil lightly moist.
For my own benefit I'm writing hear what I have done differently so far this season so I can learn from it for future seasons:
- Tripled the amount of alfalfa that I put into the soil in the fall and spring.
- Used about double the amount of bilogicals on the soil this year that I have used in the past and with that I added beneficial nematodes to the soil in the Spring.
- Watered a little more.
- Did a cover crop that I tilled in later and I put down myko with the cover crop.
- Did more targeted foliar applications to help get the plant what it needs that it isn't getting from the soil
- A lot of this came with the alfalfa but I also added probably 125% nitrogen to the soil then I have in the past.
Sunday, July 14, 2013
Pictures from the Pumpkin Patch
Below are pictures from early this morning in the pumpkin patch. Looks like the 1421 is going to end up a nice orange one. I think it is the first pumpkin I've had that has been ahead of the charts.
 |
| 1421 aka Stanley |
 |
| 1775 aka Elbert |
 |
| 335 Scherber (my son's pumpkin) |
 |
| The Patch (1421 in the foreground) |
Tuesday, June 25, 2013
Pollinated the 1421 Stelts Today at 12 Feet

Weather in Denver will be 90 today which isn't too bad. I have the female shaded and gave the plant a little extra water this morning. However the next three days will be 95-100 degrees. If a plant is stressed it will abort the pumpkin so we have to pray over the next few days that this pollination will take. We will know that for sure in about 10 days.
This female is an almost perfect specimen. There are 4 lobes, which is what I prefer and they are decently formed and the female is positioned very nicely on the vine. Now we just need her to grow big! If this pollination takes it will probably be my keeper pumpkin and I'll name it Stanley.
This evening I gave the plants a mixture of Metalosate Calcium, humic acid and Lithovit.
Subscribe to:
Posts (Atom)